A detailed review of Affinity Designer (Mac). Part 1. Tools
for some time now designers use a new program for vector graphics and illustrations — Affinity Designer. This is a detailed overview for fans to try the new work.
Developers position their program as a professional. In this review I want to find out whether pull is actually Designer on this status.
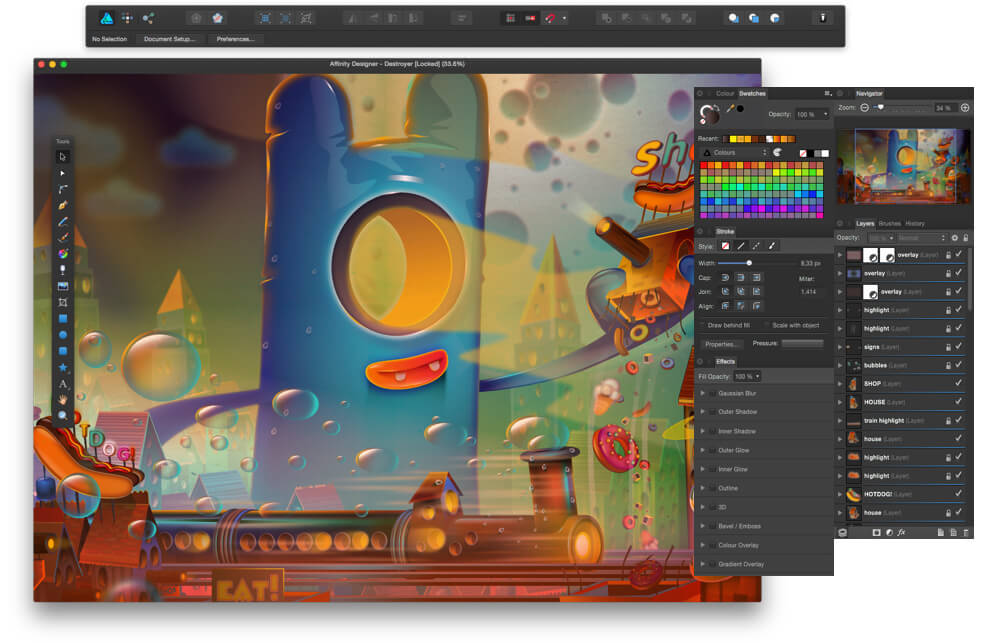
As an example, I use the illustration of "Destroyer" by Pocketstudio

the
Something between Pixelmator and Illustrator.
Everything is familiar: on the left the toolbar on top of the shortcut/action to the right sockets... don't know how they called the common word. Panels, in General. The "dark" interface, you can configure, but the range is small — from dark gray to very dark gray.
The program has three modes ("person"): vector mode (Draw Persona), pixel (Pixel Persona) and export mode (Export Persona). I will describe the elements of "Tools" for each mode separately.

the
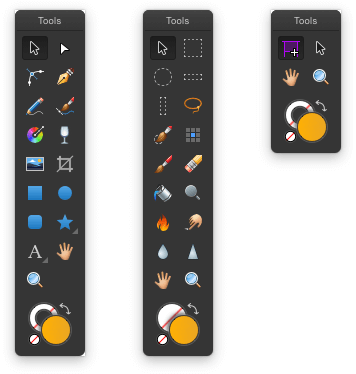
I like some design programs the opportunity to customize the number and order of elements in the panel "Tools". Such a thing is Pixelmator, Illustrator (where you can make your panel to train there that is necessary, and "preset" to cut down) and now here's the Designer.
All of this is in the View menu->Customise Tools...

Maximum you can make 8 columns of tools.
Tools list in the default order. In parentheses keys default selection.
the
the

Choice/stretch/turns objects. While holding the Shift rotation works in increments of 15°. In principle, nothing more to say. The cursor as the cursor is exactly the same in all programs.
the

Any manipulations with points and curves. When you hover over a point or curve changes its form, which is convenient (because sometimes the complicated pictures can sometimes be a mess of dots and not immediately realize that where to drag). Able to add a point on the curve by clicking it (in Illustrator to do this, hold down-don't-remember-what-and-click or select-plus-and-click).
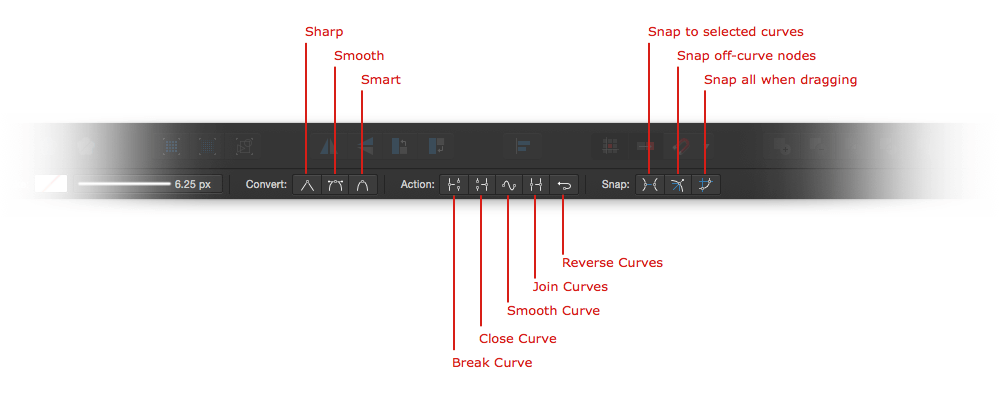
The tool has its own actions on the context toolbar:
the
the
Article based on information from habrahabr.ru
Developers position their program as a professional. In this review I want to find out whether pull is actually Designer on this status.
As an example, I use the illustration of "Destroyer" by Pocketstudio
the
Interface
Something between Pixelmator and Illustrator.
Everything is familiar: on the left the toolbar on top of the shortcut/action to the right sockets... don't know how they called the common word. Panels, in General. The "dark" interface, you can configure, but the range is small — from dark gray to very dark gray.
The program has three modes ("person"): vector mode (Draw Persona), pixel (Pixel Persona) and export mode (Export Persona). I will describe the elements of "Tools" for each mode separately.
the
General tools
I like some design programs the opportunity to customize the number and order of elements in the panel "Tools". Such a thing is Pixelmator, Illustrator (where you can make your panel to train there that is necessary, and "preset" to cut down) and now here's the Designer.
All of this is in the View menu->Customise Tools...
Maximum you can make 8 columns of tools.
Tools list in the default order. In parentheses keys default selection.
the
Tools "modes of drawing" (Draw Persona)
the
1. Move Tool (v)
Choice/stretch/turns objects. While holding the Shift rotation works in increments of 15°. In principle, nothing more to say. The cursor as the cursor is exactly the same in all programs.
the
2. Node Tool (a)
Any manipulations with points and curves. When you hover over a point or curve changes its form, which is convenient (because sometimes the complicated pictures can sometimes be a mess of dots and not immediately realize that where to drag). Able to add a point on the curve by clicking it (in Illustrator to do this, hold down-don't-remember-what-and-click or select-plus-and-click).
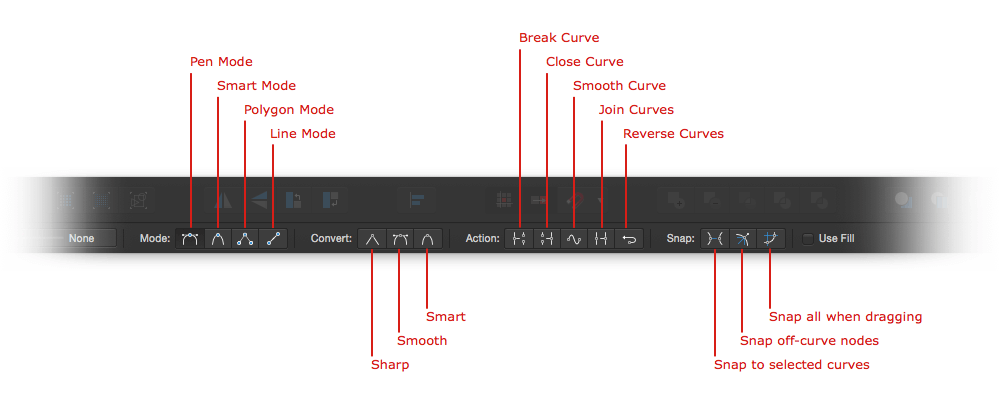
The tool has its own actions on the context toolbar:
the
-
the
- Sharp — turns "rounded" angle; the
- Smooth — does the opposite; the
- Smart — works as Smooth, only seems to be cleverly picks up the fillets and levers. But as soon as you pull the lever, the point of "smart" changes back into "smooth", so I don't really understand why this third thing necessary.
the
-
the
- Break Curve breaks a curve at your chosen point; the
- Close Curve — close a curve is selected the
- Smooth Curve smooths the selected curve; it works about as Simplify in Illustrator — if a lot of points, clearing in its sole discretion; and add points if he / she feels that once is not enough — just turned out smoother contour; the
- Join Curves connect curves into one; this is the case, if you draw the contour in several approaches; the
- Reverse Curves is to rotate the direction of the curve (the end of the curve is marked with a red point where you finish to build it); this can be useful if paint brushes to expand the direction of the stroke in the other direction.
- Snap to selected curves snap points to other points on the same curve; the
- Snap off-curve nodes — anchor-lever to the opposite point (between points will the straight line); the
- Snap all when dragging — does nothing; whether a bug, whether it is necessary very carefully and long look.
- Pen Mode — standard mode, the pen works as a regular pen in any other program; the
- Smart Mode — you just put points where necessary, and the program automatically sort all the bends myself; I never came in handy for all time use; the
- Polygon mode "polygonal shape" without distortion; the
- Line Mode — the pen draws straight lines; almost as Polygon Mode, only you need to put points, namely to hold the pen in the right direction.
- nice — can fill multiple objects simultaneously; the
- unpleasant — if to correct the point in the gradient directly on the canvas, he switched to Corner Tool; it is a program bug, promised a fix.
the
-
the
In General, the group Snap, neither the icon nor the hint you cannot understand what makes the switch. Such a thing in the interface is found in some places.
There's another at the bottom left a small tip at the choice points.

the
3. Corner Tool

Tool "corner radius". Making the fillet at the selected point (or in several). And is able to select points, respectively.
The Bake button turns the Corners to round the corners of the curves:
the
4. Pen Tool (p)

Pen. Standard tool. Dots, curves yoke, while holding the Team works as a Node Tool.
Options and actions:
the
-
the
the
5. The Pencil Tool (n)

Pencil. Has a parameter Controller, the line thickness can be adjusted with the pen "vakama".
A small smoothing when I draw (i.e. make the line smoother than you actually need). Not able, as the latest version of Illustrator will automatically connect the dots in the process, so if you make a loop in several approaches, and then have to glue the gaps to get the whole figure.
the
6. Vector Brush Tool (b)

The brush as the brush. Responds to press (if you have a tablet), is the blending modes of the brush strokes, the different figures of the stroke. One is bad: drawing brushes pixel (but high resolution) and convert it to curves you can not just rasterize.
the
7. Fill Tool (g)

Actually the default is a gradient, but you can fill and a solid color (and therefore "Fill", apparently). There are 6 types of fill: solid (the solid color), linear, elliptical, radial, conical, bitmap (fill picture pattern).

The Fill Gradient has two characteristics:
the
-
the
the
8. Transparensy Tool (y)

This is such a gradient that fills, not color, and transparency. In the same way as the gradient, you can add any number of points.
the
9. Place Image Tool

"Place an image". The same function is for programs Adobe. To put not only the picture but .ai .eps or .psd. The document is placed as a smart object, which you can access here, you can edit and save. In General works exactly the same way as larger competitors.
the
10. Vector Crop Tool

Despite the fact that the tool icon is clearly about the cropping of the canvas, it is actually a little something. Vector Crop Tool is the rectangular mask for the vector object on the canvas. The same result can be achieved by a simple attachment of the object within a rectangular figure (i.e. to make the figures of the mask), so I don't quite understand why a separate tool for this.
the
11. Rectangle Tool, Ellipse Tool, Rounded Rectangle Tool (m)

Rectangle, oval, rounded rectangle. All of the people.
the
12. Heart Tool and everything what's inside

This "smart" shapes: once you have something drawn, you can drag over specific points and change some parameters of the figure. Options depend on of the figure itself. If someone used Pixelmator vector tools, here the same.
the
13. Artistic Text Tool (t)

Just text in one line. How to do text on a path curve and, in my opinion, easier to use than in Illustrator.
the
14. Frame Text Tool (t)

It's simple — the usual text area. Works like everywhere and nothing can.
the
15. View Tool (h)

Hand to drag/pan. Like everyone else.
the
16. Zoom Tool (z)

Scaling. Works as (if I confuse nothing) in Photoshop: brings/removes in the course of movement of the mouse. Not to say that a useless tool, but I used them only in the process of writing, to check that how. For scaling I prefer Opt+Space and drag the mouse.
the
Indicator colors

Everything is like at all. I have tools in one column, so I this indicator never see. All over the enough where to look, what color are painted.
the
Tools "pixel mode" (Pixel Persona)
In General, "pixel persona" is a set of minimum required tools to add raster processing or effects to your vector image. There is still a good brush.
the
1. Move Tool (v)
Nothing to describe, the same "move tool" in the drawing mode.
the
2. Selection tools (m): Rectangular Marquee Tool, Elliptical Marquee Tool, Marquee Tool, Row, Column Marquee Tool

The first two are standard — the selection rectangle, the selection oval. Why do the second two, I do not quite understand, so reasoning is not taken. Row Marquee Tool — box height is 1 pixel by default, and the width of the whole canvas. Column Marquee Tool — frame for the entire height of the canvas and a width of 1 pixel by default.
The selected area can be dragged with the cursor, if you click "inside" it.
the
3. Free hand Selection Tool (l)
It's a lasso. By default, "free", while holding Shift works as a polygon. The selected area can be dragged with the cursor.
the
4. Selection Brush Tool (w)

The brush, drawing, sorry, selection. Works changing radius, as in all brushes. By default adds a new area, while holding Alt subtracts.
the
5. Pixel Tool (b)

This is a pencil the size of a single pixel. Works resize — will increase/decrease the box that you draw. If anyone has used exactly such a tool is Pixelmator.
Parameters:

the
6. Paint Brush Tool (b)

Brush for drawing. Interacts well with the tablet reacts to the pressing force, rotation, angle, and everything else. Has transparency settings (opacity), the amount of paint (flow), hardness (harness), wet edges (wet edges), "protection transparency" (alpha protect).
Parameters:

the
7. The Erase Brush Tool (e)

Gum. There is nothing unusual, this is everywhere.
the
8. Flood Fill Tool (g)

To fill with color. There is a setting of the threshold and the fill adjacent/non-adjacent pixels.
the
9. Dodge Brush Tool (o)

The lightening effect. There are settings, like the brushes, plus the tonal range (tonal range) and "protection of color" (hue protect). I think the familiar tool.
Parameters:

the
10. Brush Burn Tool (o)

Blackout. As Bush Dodge Tool only works backwards.
These two tools have a nice feature: preview inside the cursor, what happens after you. As in "stamp" in Photoshop, for example.
the
11. Smudge Brush Tool

Finger. There are settings of "flow" and "strength". A finger as a finger, others the same.
the
12. Blur Brush Tool

Blur. Configuration as a conventional brush.
the
13. Sharpen Brush Tool

Sharpness. Settings like brush plus a selection of the operation mode (mode): clarity, unsharp mask, harsh.

the
14. View Tool (h)
the
15. Zoom Tool (z)
Pixel tools only work with what you draw. If you insert in the layout of the photo and try to do something in the pixel mode tools, nothing works. Is clear: we have pictures to edit — go to, like, individual application.
the
Tools of the "regime export" (Export Persona)
the
1. Slice Tool (s)

Draws the segments for further export. Nothing unusual, works like similar tools in other programs.
The fragment cannot be copied: if you need more of the same, will have to draw each by hand.
the
2. Slice Selection Tool (l)
Similar to a normal cursor (as in the previous "persona"), but actually he is not. This arrow can only choose an object on the canvas and create around it a fragment (slice) from the context menu. Nothing more.
the
3. View Tool (h)
the
4. Zoom Tool (z)
the
the Overall impression of the tools
The minimum set of survival are even a little above. To draw illustrations and icons will be enough. To do something complex technical (drawings or where the building designs) in theory is also possible, but probably too many have to worry about manually.
Tools, I think, quite a professional, but the niche of these professionals a little narrower than the Illustrator.
As a bonus I have recorded the process of drawing a character for a personal project:
Next time we will understand how the panels work the "Designer". Stay tuned.


Комментарии
Отправить комментарий